Introduction
Drawing an eye can be a challenge for many artists, both new and experienced. The complexity of the shapes, the intricate details, and the need for precision and accuracy can make it seem daunting at first. However, with the right techniques and practice, anyone can master the art of drawing eyes. In this article, we will provide a step-by-step guide, video tutorial, timelapse drawing, anatomy lesson, and personal story that will help you draw lifelike eyes that capture the essence and personality of your subject.
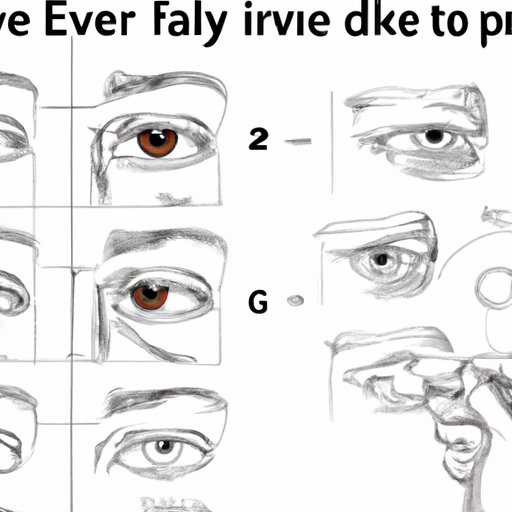
Step-by-Step Guide
Before starting to draw an eye, it’s important to break down its components into individual shapes and details. These include the iris, pupil, eyelid, eyelashes, tear duct, and surrounding skin. By focusing on each element separately, you can build up a detailed and realistic portrait of the eye.
Begin by sketching a rough outline of the overall shape of the eye. This will help you to place all the different parts in proportion. Next, add in the iris and pupil, paying attention to the size and shape of each. The iris should be larger than the pupil, and the pupil should be centered within the iris. Use shading to create a 3D effect and to show the direction of the light source.
Then, draw in the eyelashes and the eyelid. The eyelashes should be curved and taper off at the ends. The eyelid should follow the contour of the eye and have a natural curve at the end. Add in the details of the skin surrounding the eye, including wrinkles, folds, and shadows.
Finally, use a blending tool or your finger to blend any harsh lines or edges between the different parts of the eye. This will create a natural and lifelike effect that captures the essence and personality of your subject.
Video Tutorial
If you want a more visual and hands-on guide to drawing an eye, check out this video tutorial: How to Draw an Eye for Beginners. This tutorial provides a step-by-step guide that you can follow along with, as well as additional tips and insights into the drawing process. It’s a great resource for anyone who wants to develop their drawing skills and learn how to create lifelike portraits of their subjects.
Timelapse Drawing
To get a sense of the drawing process from start to finish, check out this timelapse video of a portrait artist drawing a detailed and realistic eye: Timelapse Drawing of an Eye. As you watch the video, pay attention to the techniques and tricks that the artist uses, such as shading, blending, and outlining. These techniques can be applied to your own artwork to create a lifelike and expressive portrait of your subject.
Tips and Tricks
When it comes to drawing eyes, there are several key skills and techniques that are important to master. These include perspective, shading, proportion, and attention to detail. Here are some practical tips and advice that can help you to improve your drawing skills:
- Practice drawing different types of eyes, such as those of different ages, genders, and ethnicities.
- Learn how to create depth and dimension with shading and lighting.
- Pay attention to the proportions of the eye and surrounding features, such as the nose and eyebrows.
- Study the anatomy of the eye, including the different muscles, vessels, and structures.
- Experiment with different drawing materials and techniques, such as pencils, markers, and digital tools.
Compare and Contrast
There are many different styles and approaches to drawing eyes, each with their own unique challenges and opportunities. Realistic eyes require a high degree of accuracy and attention to detail, while anime-style eyes often feature exaggerated proportions and bright colors. Here are some tips for drawing each style effectively:
- Realistic eyes: Focus on capturing the subtle details and nuances of the eye, such as the texture of the iris and the reflections of the light source. Use shading to create depth and dimension, and pay attention to the overall proportions of the face and head.
- Anime eyes: Emphasize the size and shape of the eyes, as well as the bright colors and stylized features. Draw the eyes larger than their proportional size and create vibrant and contrasting colors. Use shading to imply shape, and experiment with different shapes and design elements to create a unique and expressive character.
Anatomy Lesson
Understanding the different parts of the eye and how they work together to create vision can help you to draw more accurately and realistically. Here are some tips for drawing each part of the eye:
- Iris: Pay attention to the size and shape of the iris, as well as the texture and color. Use shading to create depth and dimension, and study reference photos of different types of irises to get a sense of the variety.
- Pupil: Keep the pupil centered within the iris, and use shading to create a sense of depth and dimension. Pay attention to the shape and size of the pupil, as well as the reflections within it.
- Eyelid: Draw the eyelid following the contour of the eye, with a natural curve at the end. Use shading to convey the shadows and folds of the eyelid, and pay attention to the thickness and shape of the lashes.
- Tear Duct: Draw the tear duct as a small triangular shape at the inner corner of the eye. Use shading to create a sense of depth and dimension, and pay attention to the shape and position of the duct in relation to the rest of the eye.
Personal Story
Learning how to draw eyes can be a rewarding and enriching experience, but it can also be challenging at times. As an artist, I struggled with capturing the true essence of my subjects’ eyes, but through practice and experimentation, I was able to develop my own style and technique. My advice to other artists is to keep practicing, keep experimenting, and never give up on your passion for drawing. With the right mindset and approach, anyone can learn how to draw lifelike and expressive eyes that captivate and delight their audience.
Conclusion
Drawing an eye is a complex and rewarding process that requires patience, practice, and attention to detail. By following the steps outlined in this article, watching the tutorial and timelapse drawing, studying the anatomy of the eye, and practicing your skills regularly, you can develop the skills and techniques needed to create lifelike and expressive portraits of your subjects.